 Follow me on Twitter @sanetwain to be kept informed on new versions.
Follow me on Twitter @sanetwain to be kept informed on new versions.
Follow me on Twitter @sanetwain to be kept informed on new versions.
When I bought a new scanner some time ago, I chose one which was supported by SANE, as it seemed logical to me to connect it to my Linux server, so I could use it from my regular Windows desktop, or from my laptop.
To my surprise, there were no decent SANE to TWAIN bridges available. There were two projects (both called WinSANE, no longer online) but neither of those did what I wanted if I could them to work at all. Another solution seemed to be to use a Windows port of XSane but that also wasn't what I wanted: I use Corel PhotoPAINT, and I want to scan from within PhotoPAINT. (When I was more or less finished, I saw that another bridge (twain-to-sane-bridge) had been released. Luckily, again, that did not everything I needed.)
So I decided to write my own bridge. A first attempt used the Windows port of the net backend of SANE which was used for WinSANE, but somehow I didn't get it to work without generating a GPF after a while. The project was put on hold for a while, and in october 2001 I took it up again. This time I decided to write my own socket communication layer, talking to the SANE net backend myself.
For the TWAIN layer on top of the SANE layer, I looked around for examples of TWAIN DataSources. The TWAIN working group provides an example with their development kit, but it didn't stand out in clarity. On the Dosadi website I found the GenDS package, which supports developers in writing TWAIN datasources. This framework worked just fine, although getting Borland VCL (used for the GUI) and Microsoft MFC (used by GenDS) to work together took some effort.
From version 1.27 onwards, I've replace the GenDS toolkit by a port of another TWAIN layer, based upon the TWAIN SANE layer for MacOS X. After upgrading to Windows XP and version 6 of the Borland C++ compiler, I found that I couldn't get the combination of MFC and VCL to compile successfully.
It might be obvious, but you will need a working SANE installation first, on the server to which the scanner is connected (usually a Linux server). See the SANE website for more information.
After downloading SaneTwain (see below), unzip the files. Put ScanImage.exe anywhere you want, it is a stand-alone version of SaneTwain, more or less like xscanimage.
Put the SaneTwain.ds file in the twain_32 folder of your Windows system folder . If you don't have a twain_32 folder, your computer might not have TWAIN installed, see the TWAIN website for details on downloading the TWAIN Data Source Manager. Make sure the SaneTwain.ds file has execution rights set.
It is recommended to start ScanImage first, to set-up the connection
to your SANE server. (Note: if you are using Windows NT or 2000, it is probably
wise to run it the first time as Administrator). The first time the program is started, a properties
window will be shown. This window can be recalled later using the
the properties button (![]() ).
All settings in this window are stored in the sanetwain.ini file, which
is stored in your user profile.
).
All settings in this window are stored in the sanetwain.ini file, which
is stored in your user profile.
If the sanetwain.ini file is read-only, the properties button will be disabled, and the user cannot change any of the above properties. This might be useful in closed environments.
It is possible to move the sanetwain.ini to one of the following locations once it has been created: %WINDIR%, %ALLUSERSPROFILE%, or the folder in which the executable is stored. SaneTwain will try these folders in that order, and if no INI file is found in any of these directories, fall back to users profile.
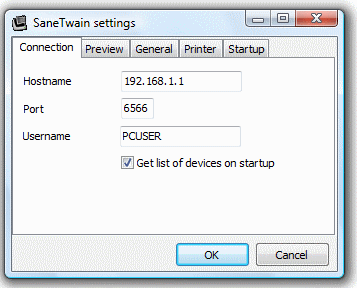
On the "Connection" tab, you can enter hostname and portnumber (the default is usually OK). Leave the "Get list of devices at startup" checkbox checked, so the software will retrieve a list of available devices. Unless your SANE setup is not a default one, the username can also be left as PCUSER.
On the "Preview" tab, you can usually leave "Use minimum resolution" checked, unless the minimum resolution for your scanner is too low to give acceptable previews. If this is the case, change it to "Use the following resolution" and enter a suitable resolution in the next field. You can also enable an automatic "Find fit" here, see Regions for more details.
On the "General" tab, there is an option to instruct SaneTwain to display its window always on top of all other windows. This might be useful if you are using SaneTwain from a TWAIN application which raises itself on top of the SaneTwain window.
The next option, when checked, will cause all inactive options to hidden (instead of being shown disabled). Any change will take effect after the next restart.
When you change a scanner option, and the backend instructs SaneTwain to reload scanner options, any regions you might have set will be removed. If you want to keep any regions (which could be invalid due to the changed scanner options), uncheck "Remove regions when parameters change".
If you want to define a default region to be used by default each time you use SaneTwain, check the "Save regions on exit". Any regions active when the application closes will be saved to the sanetwain.ini file, and restored next time the program starts. This is mutually exclusive with the previous option.
See the ADF section for more information on the ADF option.
When saving scanned regions as JPEG images, the quality factor used for those JPEG files can be set on this tab as well.
Check "Show printer setup dialog before print" to bring up the standard Windows printer setup window before each print action.
By default, each scan made will be printed immediately after the scan completes. If you want to collect all scans into a single print job, check "Delay printing until program exit". This is useful if you print for example to a PDF writer, and you want all scans in a single PDF file.
If you want a different printer used as default with the Print button, select a printer here. Note: this will not change your default Windows printer. This can be useful for example when you use the print option always to print a scan to a Fax printer driver.
Fill in your Evernote email address to enable the "Scan to Evernote" button. Fill in the subject to use when mailing documents to your Evernote account. Use @folder and #tag1 #tag2 to specify the folder and tags to use. The "Scan to Evernote" button will always send the documents without further user intervention. If you want to use a different folder or tags for each scan, use the regular "Scan to mail" button.
If you want SaneTwain to automatically start a preview or a full scan when the program is started, check either "Acquire preview on program start" or "Acquire full scan on program start".
On this tab you can also select the language to use in the user interface. Only languages for which I have translations are shown. If you are willing to create a translation for another language, and are willing to keep those translations up to date if I add new strings, please contact me!
Please note that after changing the language you need to restart the application to take full effect. Also note that any saved option values are saved "localized", so they need to be resaved.
When using SaneTwain in a "closed" environment such as a terminal environment where users are not allowed to write to or update files in the Windows folder, it is possible to provide a read-only INI file. Create the INI file logged in as a user who is allowed to modify files in the Windows folder (or copy an INI file from another computer), and change the file properties to "Read-Only". SaneTwain will read the file, but will not allow the user to change any settings.
Another option would be to provide an INI file in the Windows system folder or the %ALLUSERSPROFILE% folder, with the following setting in the [General] section: INICopyGlobalToUser=1. This will instruct SaneTwain to copy that (possibly read-only) system wide INI file to the users %USERPROFILE% folder. From then on, the users copy will be used. The global version could be used to provide system defaults, such as hostname, or "preset" devices as described below.
These "preset" devices in the INI file allow either multiple scanners attached to different servers to be used using a single INI file, or to alias one scanner to multiple names, each having different default values for one or more options. Note that this differs from "Get devices at startup", which only fetches the devices from a single server.
To enable this, using the regular user interface, create scanner settings for each required scanner. This might involve setting hostname for each scanner, letting the software retrieve all available scanners, setting options, and saving them (see the section Saving options below). After each scanner, move the the Host and optionally Port and Username keys to the section for the scanner being configured, and optionally rename the scanner device name (for a more user friendly scanner name; the scanner device name is used as section identifier in the INI file).
When done with all scanners, add a Devices key to the [Connection] section, using a comma separated string of scanner names as value. Optionally set the Device key to one of these scanners to use as default, or remove the key.
Now the next time SaneTwain starts up, it will insert each defined scanner in the combobox for choosing a device, and will set its preset option values.
An example of this setup is as follows:
   [Connection]
   Devices=My Scanner (color),My Scanner (gray)
   User=PCUSER
   Port=6566
   Device=My Scanner (color)
   GetDevices=0

   [My Scanner (color)]
   Host=scanner.example.tld
   Device=epson:/dev/usb/scanner0
   mode=Color
   resolution=150

   [My Scanner (gray)]
   Host=scanner.example.tld
   Device=epson:/dev/usb/scanner0
   mode=Gray
   resolution=300
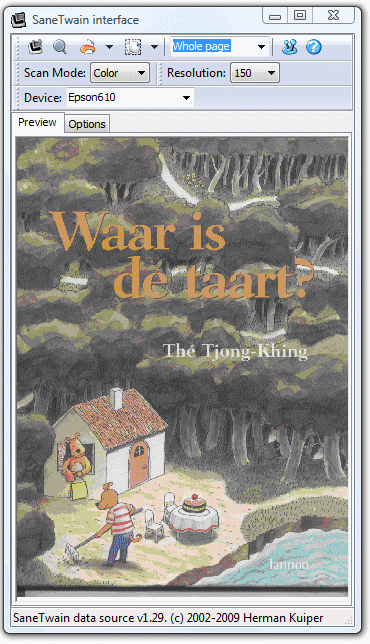
After pressing OK, the main window should appear (see above). In the combobox
at the top right, all available devices should appear. If you have just one
device, or have only one device you want to use with SaneTwain, you press
the properties button (![]() )
and uncheck the checkbox: this will shorten startup time. The drawback is that you cannot
change devices within a single session.
)
and uncheck the checkbox: this will shorten startup time. The drawback is that you cannot
change devices within a single session.
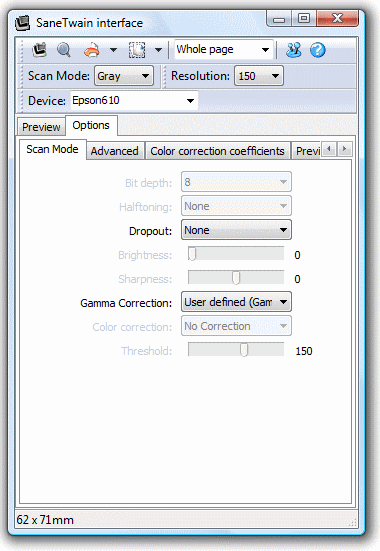
The SaneTwain GUI will query the selected SANE device and will retrieve all options available. Each of the options (except for a few well know options, see below) are translated into an input component and placed on one of the option tabs. For string, fixed and integer options without constraints, a text input field is used. For options with a list constraint, a combobox is used. For options with a range constraint a trackbar is used, except when the option allows multiple values, then a curve input window is used (see below). Boolean values are represented by a checkbox, and 'button' options by a button (...).
When the value of an option is changed, the new value is sent to the SANE backend. This in turn might lead to a reloading of other option values: for example when the scan mode is changed from "color" to "black and white" the dropout option might be disabled, as it has no meaning for the new mode.
For a few well known options, there are special cases: the scan resolution and scan mode will appear on the main window toolbar if the backend supports these options.
The toolbars all have a popup menu (right click on an empty area of a toolbar) with which any of the other options can be attached as toolbar to the top of the window. This allows for quick access to much-used options. Options selected as such are stored in the INI file, and those toolbars are reconstructed on start up.
On the same popup menu there is also the option to toggle the use of large icons for the main toolbar.
It is possible to save option values as defaults to the sanetwain.ini file. Just move the mouse over the input component for the option (e.g. a combobox, or a text entry field), and press Ctrl+S. A message should appear at the bottom of the window with the name of the option and the saved value. The next time SaneTwain is started, the defaults will be read after opening the scanner device. Saving options does not work for "button" options and options which can have multiple values. All options can be saved in one go by pressing Ctrl+A when the main window has focus. Note that this might not work with all combinations of options and values, as setting one option might influence possible values for other options, and all options are restored from sanetwain.ini in the order the backend defined.
It is now also possible to have saved option values to be sent to the backend at the moment SaneTwain exits. This could be useful for example for backends where the lamp is not correctly being turned off. See Advanced INI settings for more details.
You can request a preview from the SANE backend by pressing the preview button
( ). This will retrieve a preview
using the lowest resolution available, in the scan mode selected. When the backend supports
setting the region-of-interest (i.e. allowing scanning only parts of the scan area),
SaneTwain will allow you to select regions with the mouse.
). This will retrieve a preview
using the lowest resolution available, in the scan mode selected. When the backend supports
setting the region-of-interest (i.e. allowing scanning only parts of the scan area),
SaneTwain will allow you to select regions with the mouse.
The main image at the top shows two selected regions. Regions can be selected (when supported by the backend) by pressing the left mouse button at one of the corners of the region you want to select, and while holding down the mouse button, dragging the mouse to the opposite corner. During this drag a "rubber band" will show the new region. After releasing the mouse button, the new region will be drawn using a "walking ants" rectangle.
Existing regions can be resized by moving the mouse over one of the region borders (the mouse cursor will change to indicate you are over a region) and pressing the mouse button and dragging the border to its new position.
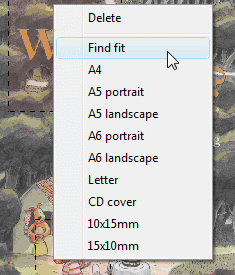
A region can be deleted by moving the mouse over one of its borders, and pressing the right mouse button. A pop-up window will show (see image on the right) from which you can select the Delete option.
The same menu also contains a "Find fit" option, which will try to find the tightest rectangle fit for the image acquired during preview. It more or less works on my scanner, but your mileage may vary... There is an option in the INI file to tweak its behaviour, EdgeThreshold in the "General" section (not settable through the GUI; defaults to 10). If you like how it works, you can enable it to be done after each preview automatically in the settings popup.
The same pop-up also contains a number of preset paper sizes. When selecting one of those,
all currently defined regions are deleted, and a new region of the specified size is
created, anchored in the top-left hand corner. The main toolbar also contains a button
for these common presets ( ).
).
After selecting the regions you want to scan, press the scan button
( ) to scan those areas. When using
ScanImage a file selection dialog box will appear asking for the name of the image
(when scanning a single region) or the basename of the image when scanning multiple regions.
Here you can also choose to save as PNG, JPEG or BMP format.
The basename will be appended by a sequence number for each region. For single scans, a popup
will be shown to ask if an existing filename may be overwritten. If not, a new file selection
dialog will be shown; select a new filename, or select Cancel to cancel the scan. For
multiscans, if for one or more sequence numbers the file aready exists, the sequence is
incremented until a "free" filename is found.
) to scan those areas. When using
ScanImage a file selection dialog box will appear asking for the name of the image
(when scanning a single region) or the basename of the image when scanning multiple regions.
Here you can also choose to save as PNG, JPEG or BMP format.
The basename will be appended by a sequence number for each region. For single scans, a popup
will be shown to ask if an existing filename may be overwritten. If not, a new file selection
dialog will be shown; select a new filename, or select Cancel to cancel the scan. For
multiscans, if for one or more sequence numbers the file aready exists, the sequence is
incremented until a "free" filename is found.
When running SaneTwain as stand-alone application (using ScanImage.exe), there will also be
a print button ( ). After selecting the
regions you want to scan, press the print button to scan those areas and print each region as
a separate document. This function is mainly intended to make a quick copy of a page, or to
fax a page, so there are not many options which can be set. When the button itself is
pressed, the default printer is used. If you have more than one printer installed, you can
select the printer to use through the small popdown menu which is attached to the little
triangle to the right of the button. Selecting a printer will immediately start the scan.
). After selecting the
regions you want to scan, press the print button to scan those areas and print each region as
a separate document. This function is mainly intended to make a quick copy of a page, or to
fax a page, so there are not many options which can be set. When the button itself is
pressed, the default printer is used. If you have more than one printer installed, you can
select the printer to use through the small popdown menu which is attached to the little
triangle to the right of the button. Selecting a printer will immediately start the scan.
When running SaneTwain as stand-alone application (using ScanImage.exe), there will also be
a mail button ( ). After selecting the
regions you want to scan, press the mail button to scan those areas and have them attached
to a new mail message. If you have entered your Evernote email-address in the setup,
an additional Evernote button will also appear (
). After selecting the
regions you want to scan, press the mail button to scan those areas and have them attached
to a new mail message. If you have entered your Evernote email-address in the setup,
an additional Evernote button will also appear ( ).
This functions in the same way, but will send the mail to Evernote without going through your email program,
using the supplied subject. If you want to use different Evernote tags and folders for each scan, use the regular
email button. Both mail buttons expect a MAPI-compatible email-client to be installed.
).
This functions in the same way, but will send the mail to Evernote without going through your email program,
using the supplied subject. If you want to use different Evernote tags and folders for each scan, use the regular
email button. Both mail buttons expect a MAPI-compatible email-client to be installed.
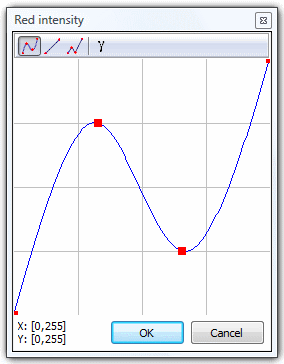
For numeric options which can have multiple values (most notably gamma correction tables),
a special curve input window is available. These options have a curve button
( ) as input component. When you press
the button, a separate window will open. The idea behind the window is that for each value on
the X axis, the "curve value" at the Y axis is used as the X'th value of the option.
) as input component. When you press
the button, a separate window will open. The idea behind the window is that for each value on
the X axis, the "curve value" at the Y axis is used as the X'th value of the option.
By using the buttons at the top of the window, three pre-defined curves can be selected, or a "gamma curve" can be drawn, using a specific gamma value. After selecting one of the pre-defined curves, the curve can be modified by dragging on of the red handles to a new position, or by clicking on the curve between two red handles, which will insert a new handle.
SaneTwain will try to determine if your scanner supports Automatic Document Feeding (ADF) by looking for an option 'source' with a value 'Automatic Document Feeder' or 'ADF', or a boolean option with the letters 'adf' in its name, and set to true.
Currently, only one region per page is allowed when using an ADF. By default, SaneTwain scans just a single page each time. By unchecking the appropriate option on the 'General' settings-tab, SaneTwain will try to keep scanning the same region over and over until the scanner returns an error.
The TWAIN datasource version of SaneTwain currently ignores the "scan single page" option, and always will try to scan all pages in the feeder.
SaneTwain tries to guess whether the scanner backend has an option which would require the user to press a button before starting the scan. As there is no "well-known" option for this, SaneTwain inspects the option names for the string "wait" and "button". If such an option is encountered, and it set when a scan should start, a messagebox will pop-up reminding you that a button should be pressed. (Note: this is not fool proof, let me know if this not work with your scanner setup).
It is now possible to float the Preview and Options tabs if you want to. Just drag a tab off the SaneTwain window - the mouse cursor will change to indicate when you can release the mouse button. To attach a floating tab back to the main window, drag and drop it where it originally came from.
sanetwain.ini:
[Voodoo]
RemoveWordKey=\Software\Microsoft\Office\10.0\Common\Scan
The exact name of the key is depends on the Word version you are using, and it might not help with other versions of Word. If this is set, SaneTwain will remove the given key on startup, therefore hopefully allowing Word to scan. Use at your own risk.
Many of the more often used settings can be set through the Properties button. Any values set there are saved to the INI file. Also any backend values saved using Ctrl-S are saved to the INI file.
In addition to these, there are a number of less used options which can be set manually in the INI file. This section describes these settings. In the the list below, [Save] RunCommand would refer to a value RunCommand in the [Save] section of the INI file.
See also the closed environment section on adding "virtual" scanners with different value sets.
It is now also possible to have values in the INI file to be sent to the backend the moment SaneTwain exits. This could for example be used in situations where the backend does not properly turn off the lamp, and an option to turn off the lamp is available. To enable this, save the necessary option value(s) as described in Saving options, and in the INI file prefix the option name(s) with OnExit. (include the dot; use the actual backend option name, not the label shown in the user interface). So, for the given example, have a key OnExit.lamp-switch=0 in the section for your scanner (assuming your backend has an option lamp-switch).
The latest version of SaneTwain is available as a ZIP-file.
A Windows installer is also available. My thanks to Sebastian Krysmanski for providing an the installer package.

The binaries of SaneTwain.ds and ScanImage.exe are released as e-mail-ware: please send me an e-mail if you use the program. If you are really ecstatic about SaneTwain, I have a wish list at Amazon.
The TWAIN layer is partly based on the TWAIN SANE Interface for MacOS X by Mattias Ellert. Two header files from the SANE project are used. Translations were gracefully provided by Jörg Napp, Roland Jeremies, Serdar Ozler, Peter Vereshagin, Anthony Bourguignon, Wladston Viana, Peter Molnar, Riccardo Di Pietro, Yuan Chia Fu, Petr Kopiste, Wojciech Jeczmien and Eduardo Bellido. Sebastian Krysmanski provided the installer for SaneTwain. Wolfgang Klein provided the hotplug scripts.
The following are known issues, bugs, etc:
